创建项目
通过idea的Spring Initializr来创建项目
Group一般是你组织的名字,例如:域名.公司名.项目名
artifact一般写为:项目-xxx
SpringBoot + Mybatis 简单的测试
1、基础配置
首先我们对环境进行配置,pom.xml的dependencies配置如下
1 | <dependencies> |
经过测试mybatis为默认,mysql为8.0.17,springboot只需要用默认的即可,thymeleaf也是用默认的即可。
然后对application.properties进行配置,配置如下:
1 | spring.datasource.url=jdbc:mysql://localhost:3306/数据库名?useUnicode=true&characterEncoding=UTF-8&serverTimezone=UTC |
2、SpringBoot + Mybatis 的层
一般情况下我们分为四层
controller层:调用service层的接口,进行业务操作。
entity层:entity层和model层等价,存放的是实体类,属性值与数据库中的属性值保持一致。实现set和get方法(这一步不可以少,少一个get或者set都不行,只需要默认的get和set即可)。
mapper层:dao层和mapper层等价,对数据库进行持久化操作,它的方法是针对数据库操作的,基本用到的就是增删改查。他只是定义一个接口,然后在mapper.xml中实现接口和数据库的交互。
service层:存放业务逻辑处理,不直接对数据库进行操作,有接口和接口实现类,提供controller层调用方法。
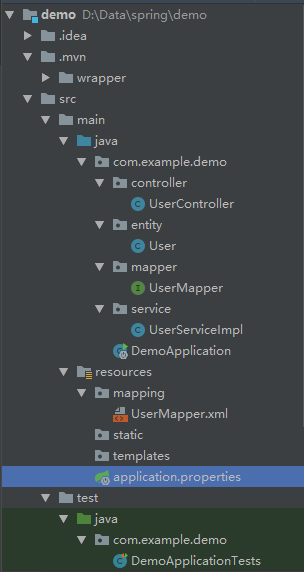
在resources类中创建一个包,用于存放Mapper.xml
具体分布如下图所示
3、代码实现
controller层:UserController
1 | package com.example.demo.controller; |
entity层:User
1 | package com.example.demo.entity; |
mapper层:UserMapper
1 | package com.example.demo.mapper; |
service层:UserService
1 | package com.example.demo.service; |
mapping.xml配置:UserMapper.xml
1 | <?xml version="1.0" encoding="UTF-8"?> |
运行效果:

注意事项:
1、如果service层@Autowired注解的变量出现了ERROR,但是运行时没有问题,请在Mapper层接口头部添加@Repository
2、请注意mapper.xml文件中的目录,若报错,请注意查看
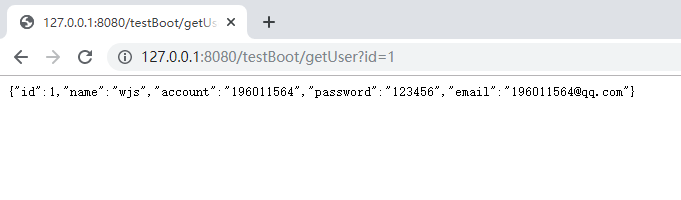
带参数的输出某id的数据库数据
1、UserMapper.java需要加上getUser(Integer id)
1 | package com.example.demo.mapper; |
2、UserService.java需要定义getUser(Integer id)
1 | package com.example.demo.service; |
3、UserController添加新的业务
1 | import com.example.demo.service.UserService; |
4、UserMapper.xml需要添加新的sql语句
1 | <?xml version="1.0" encoding="UTF-8"?> |
运行效果
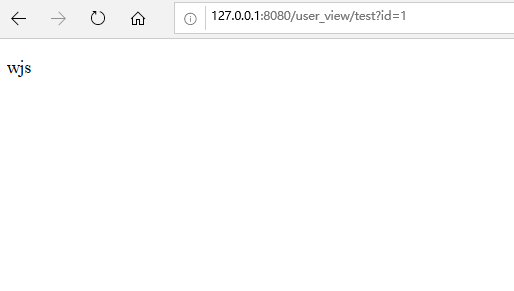
通过thymeleaf显示数据库数据
1、首先我们再创建一个view层,java代码类似于UserController,但是不同的是把restController替换为Controller,这样就可以跳转到指定的网页了,如果函数参数中带有model就可以传入数据到网页,通过thymeleaf来渲染网页。
2、UserView代码如下
1 | package com.example.demo.view; |
3、接着我们开始写html,这里我们需要用到类似于EL语言的写法,代码如下
1 | <!DOCTYPE html> |
运行效果如下:
本博客所有文章除特别声明外,均采用 CC BY-NC-SA 4.0 许可协议。转载请注明来自 咲夜南梦's 博客!


评论